D365 FinOps Creating, updating, deleting and deploying model
I have given a brief description of a model in my previous article.
In this article I will be giving an overview of how we can create, modify, remove and deploy a FinOps model.
Note: The instructions in this article are for a FinOps development environment that has the dynamics 365 extensions enabled on Visual Studio Studio 2019. The location of the Dynamics 365 menu may differ in other versions of Visual Studio.
Create a new model file
- Open Visual Studio in admin mode
- Navigate to Extensions > Dynamics 365
- Select Model Management > Create model
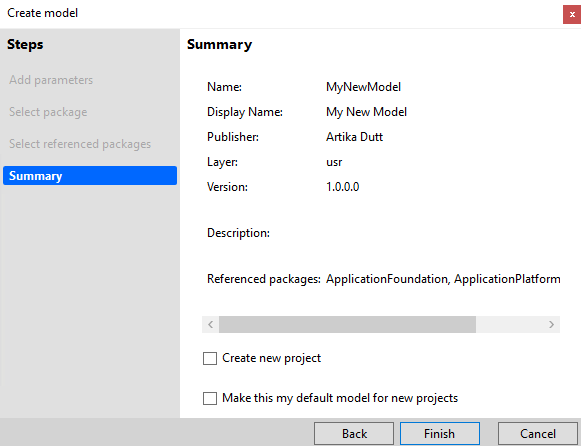
- Enter the model details
Model name - the name of the model, for example, MyNewModel
Model publisher - the name of the model publisher, for example Artika Dutt
Layer - this represents the level you intend for your deployment. If you are a Microsoft partner then choose isv. If you are performing development for a customer then choose cus layer. If you are developing for users then choose usr.
See this article for more details.
Version - this is the current version of the model. Can be incremented after every update.
Model description - the description of the model
Model display name - the display name for the model
Once complete the new model will be created.
Navigate to View > Application Explorer
Once a model has been created, a new folder with contents of the model with the same name as specified in the model name section above will be created in your ./AosService/PackagesLocalDirectory.
The descriptor located ./AosService/PackagesLocalDirectory/MyNewModel/Descriptor contains the details of the model as specified in the create model wizard.
This is what a descriptor file looks like. Notice the DisplayName, Layer, ModelModule, Name, ModuleReferences and Publisher. These are the same as specified in model create section.
Modify a model
To modify a model the descriptor file can be either be manually updated from the location within AosService or it can be modified using the tool.
- Open Visual Studio in admin mode
- Navigate to Extensions > Dynamics 365
- Select Model Management > Update model parameters
- Select the model name from the drop down list
- Now you can modify any detail, for example, update the model version to 10.0.30.1
- Choose Next. We can also update the model references, for example, add reference to Retail.
- Choose next and click Finish
Export a model file
For distribution we can create a deployable package that can be applied to a LCS environment. This will however contain only the binaries of the model. The contents of the model can also be distributed as a model file which will have access to all the elements within the model.
To achieve this;
- Open command prompt in admin mode
- Navigate to the ./AosService/PackagesLocalDirectory/bin folder.
- Enter the following command
%YourDrive%:/AOSService/PackagesLocalDirectory/Bin/ModelUtil.exe -export -metadatastorepath=%YourDrive%:\AosService\PackagesLocalDirectory -modelname="%ModelToExport%" -outputpath=%OutputPath%
For example,
K:/AOSService/PackagesLocalDirectory/Bin/ModelUtil.exe -export -metadatastorepath=K:\AosService\PackagesLocalDirectory -modelname="MyNewModel" -outputpath=K:/Temp - Once complete this will generate a file with extension .axmodel within the output path specified.
Deploy a model
We can deploy the contents of a model as part of a deployment package to any LCS environment for FinOps. This will however, not allow you to modify any of the contents of the model. It will be installed as binaries. I will discuss more on this in later in one of my articles.
- Open command prompt in admin mode
- Navigate to the ./AosService/PackagesLocalDirectory/bin folder.
- Enter the following command
%YouDirve%:/AOSService/PackagesLocalDirectory/Bin/ModelUtil.exe -import -metadatastorepath="%YourDrive%:\AosService\PackagesLocalDirectory" -file="%YourPath%\%ModelName%.axmodel"
For example,
K:/AOSService/PackagesLocalDirectory/Bin/ModelUtil.exe -import -metadatastorepath="K:/AosService/PackagesLocalDirectory" -file="K:\Temp\MyNewModel.axmodel" - This will import your model into the packages local directory folder of the AOSService.
- Build and compile your model from Visual Studio
- Run database sync
Delete a model
When developing within a development environment we have the option to delete models manually as well. Recommendation is to remove models from the deployable package and apply it to the environment. I will discuss on this approach in one of my later articles.
In this section I want to go over the deletion process for the model files.
- Open command prompt in admin mode.
- Navigate to the ./AosService/PackagesLocalDirectory/bin folder.
- Enter the following command. In this case t
%YourDrive%:/AosService/PackagesLocalDirectory/bin/ModelUtil.exe -delete -metadatastorepath="%YourDrive%:\AosService\PackagesLocalDirectory" -modelname="%ModelName%"
For example,
K:/AosService/PackagesLocalDirectory/bin/ModelUtil.exe -delete -metadatastorepath="K:\AosService\PackagesLocalDirectory" -modelname="MyNewModel" - Choose yes to delete the model.
- Navigate to the ./AosService/PackagesLocalDirectory folder within file explorer and confirm that the folder for MyNewModel has been removed and search for the model name in Application Explorer within Visual Studio to confirm that the model does not exist.


Comments
Post a Comment